
Analyse default BIOS protection of your system against LoJax: UEFI rootkit
LoJax is first rootkit in the wild that try to write a UEFI module into system's SPI Flash Memory. You can analyse your system's default BIOS/UEFI protection against such malware which we will discuss in this article.


Researchers have found first UEFI rootkit malware in the wild named Lojax. The malware is operated by Sednit APT group and is first discovered by ESET team(report blog). The malware try to write a UEFI module into system's SPI Flash Memory. If successful, it drop and execute a malware into storage disk during boot process.
Writing to SPI Flash Memory is not a new method, as it is best place that malware can use to be undetected and persistence forever(He who runs first, runs best). Many other wild BIOS rootkits and POC malware use this method to persist themself. BIOS protection against writing to SPI Flash is setup by your system vendors. If they have provided a proper security mechanism against firmware attacks then you may be safe from most of these malware, otherwise you can be a easy victim. But you can analyse the current protection of you BIOS/UEFI and sometime patch them to be better protected. We are going to discuss how your system protect you against these malware and how to analyse yourself the default firmware protection in this article by taking example of Lojax malware's infection process.
What is SPI Flash Memory?
SPI Flash is where you BIOS code/executable is most likely present. It also contain other feature code like Management Engine (ME), Gigabit
Ethernet (GbE) and is secure using hardware enforced security protection mechanism provided in chipset and Flash descriptor.
How Lojax malware works?
Malware contain kernel driver, RwDrv.sys which is use to access UEFI/BIOS settings using RWEverything tool. As quoted in ESET blog:
Three different types of tool were found alongside LoJax userland agents. The first one is a tool dumping information about low level system settings to a text file. Since bypassing a platform’s protection against illegitimate firmware updates is highly platform-dependent, gathering information about a system’s platform is crucial. The purpose of the second tool was to save an image of the system firmware to a file by reading the contents of the SPI flash memory where the UEFI/BIOS is located. The third tool’s purpose was to add a malicious UEFI module to the firmware image and write it back to the SPI flash memory, effectively installing the UEFI rootkit on the system. This patching tool uses different techniques either to abuse misconfigured platforms or to bypass platform SPI flash memory write protections.
To understand easily, below figure shows the path taken by malware to write to SPI Flash.
Understanding BIOS security mechanism against writing to Flash
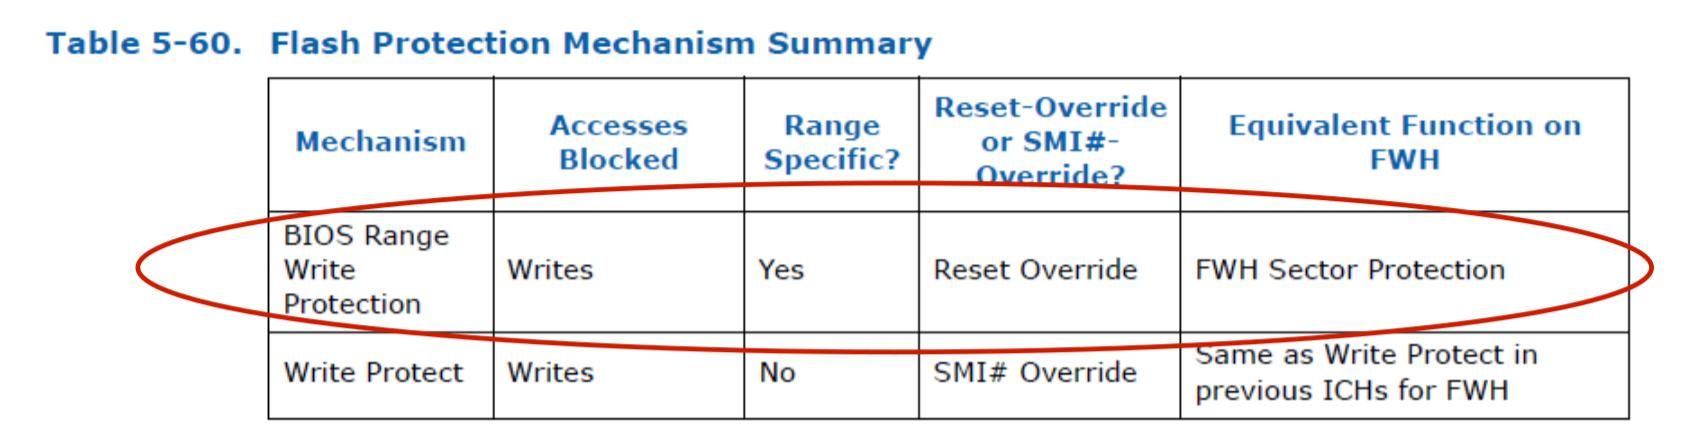
To lock the BIOS flash, two different mechanism are used:
– BIOS Range Write Protection
– Global Flash Write Protection

Global Flash Protection(second in above image) applies to the entire flash chip, provides SMM the ability to determine whether or not a request to unlock the BIOS flash for writing will be permitted. The protection is applied through BIOS_CNTL (bios control) register.
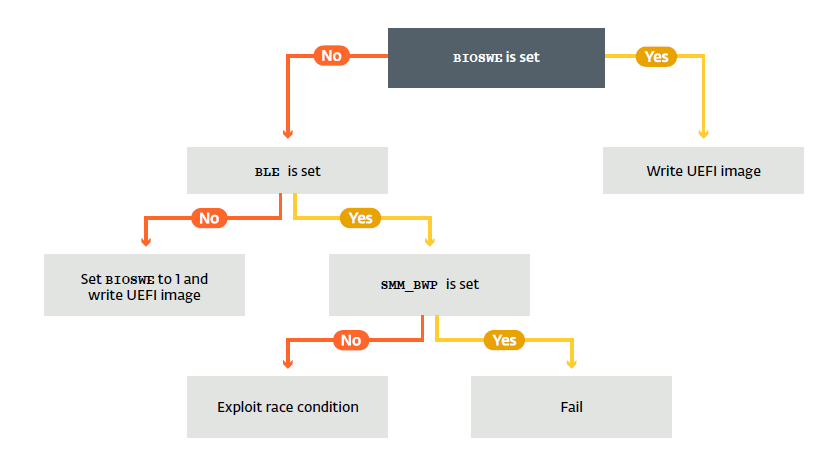
Two important bits present in BIOS_CNTL that the Lojax malware look for are:
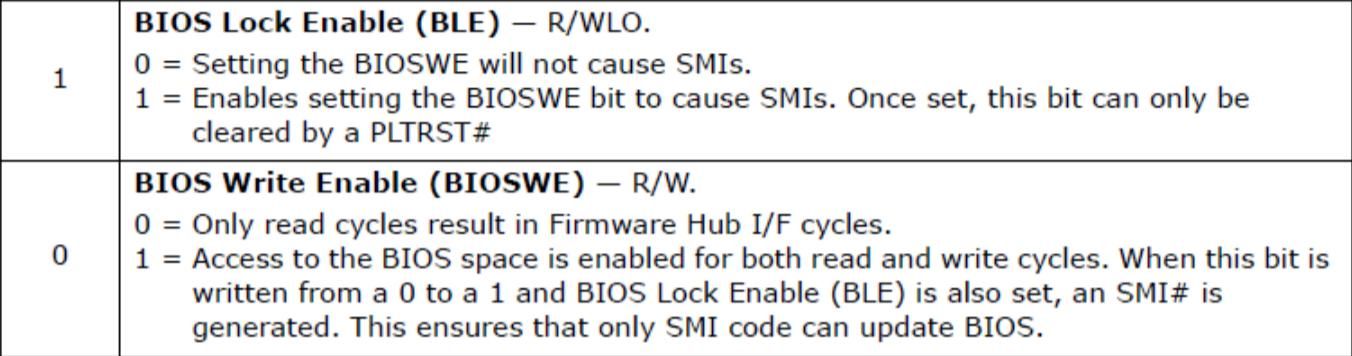
BIOS_CNTL.BIOSWE (bit 0) enables write access to the flash chip. If it set to 1 then malware can write to BIOS. Otherwise it look for BIOS_CNTL.BLE bit. If the value set to 0, malware can change BIOSWE bit to 1 and then write to BIOS flash. If BIOS_CNTL.BLE set to 1 then only SMI handler will explicitly change BIOSWE bit to 0 on every try to write to bios. Although it further depend on BIOS_CTL.SMM_BWP flag.
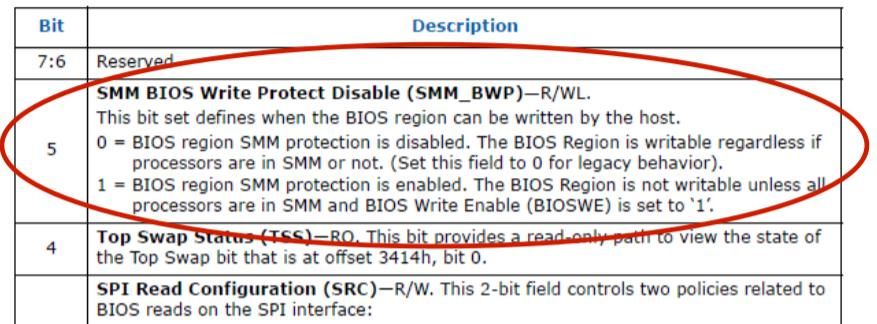
If this flag set to 1 then all processor need to be in SMM mode to write to bios which is not possible to archive through malware so it will fail to write to BIOS and terminate. If it set 0 then above condition is not necessary and malware can use Race condition based attack(out of scope for this article) to change BIOSSWE to 1.
Now lets look at second protection mechanism called Range write protection.
There are 5 Protected Range registers (0-4) with independent R/W permissions. They overwrite the Global write protection and if set for a particular memory range then that range is not writeable by anyone.
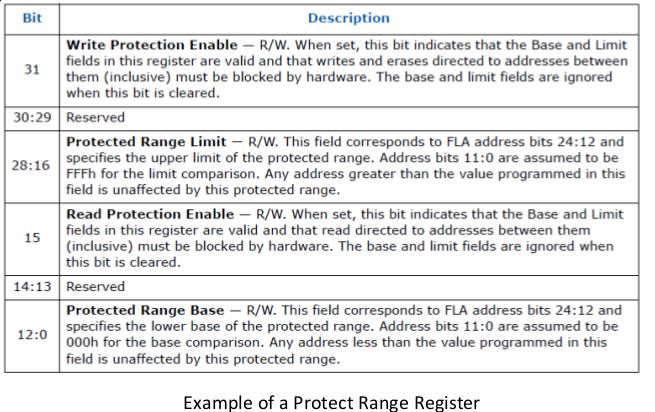
If your vendor has set these registers then most of the region in you bios is safe from overwritten.
Checking current protection in your system
We will first use a framework called Chipsec( platform security assessment framework) to analyse the current system firmware (BIOS/UEFI) security. You can install it on Windows or Linux machine using pip python package manager. Complete installation instruction here.
I am testing this on my Lenovo Z50-70 laptop with chipsec installed on kali linux.
Once you successfully installed chipsec, use the following command as root/sudo to run automated test suite that scans for typical security vulnerabilities.
$sudo python -m chipsec_main
You will prompt with lots of details but the one that is important to us is output from module bios_wp.

Here you can see that for my machine BIOSWE is set to 0 but BLE is also zero. So malware can easily set BIOSWE to 1 and write to my bios. Even if BLE would be 1 still SMM_BWP is 0, means race condition based attack is possible. Now look at next protection mechanism-Range write protection.

Only two address range is protected from write, remaining ranges are not set by my vendor.
Different vendors provide different level of protection but my default setting is failed against LoJax like bios rootkits.
Finding if your system is already infected.
To find if your system is already infected with LoJax you must have a clean image of your UEFI/BIOS when it was not infected. You can diff the clean image and infected image to find if something has been altered or not.
You can use a tool called copernicus to get a copy of our bios. To run it open admin prompt cd to the folder where you extract the zip and execute
standalone.bat.
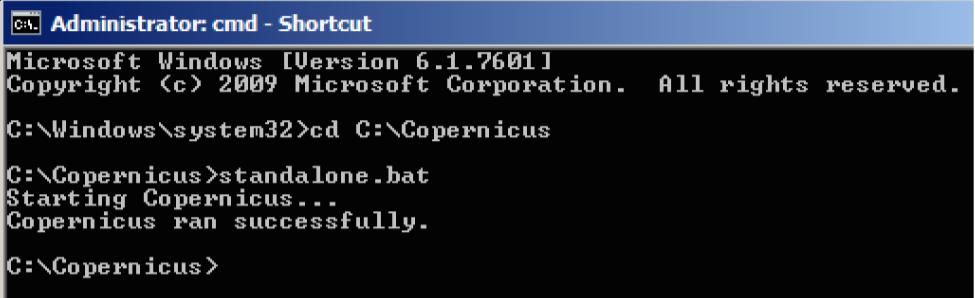
Copernicus drops it’s output into the base of the C:\ drive with filename COPERNICUS_BIOS.bin . You must have one earlier image where you are sure your system is not infected then you need to take the recent image when you feel you are infected.
Now you can use bios_diff.py(present inside copernicus directory) to compare both images and find the difference.
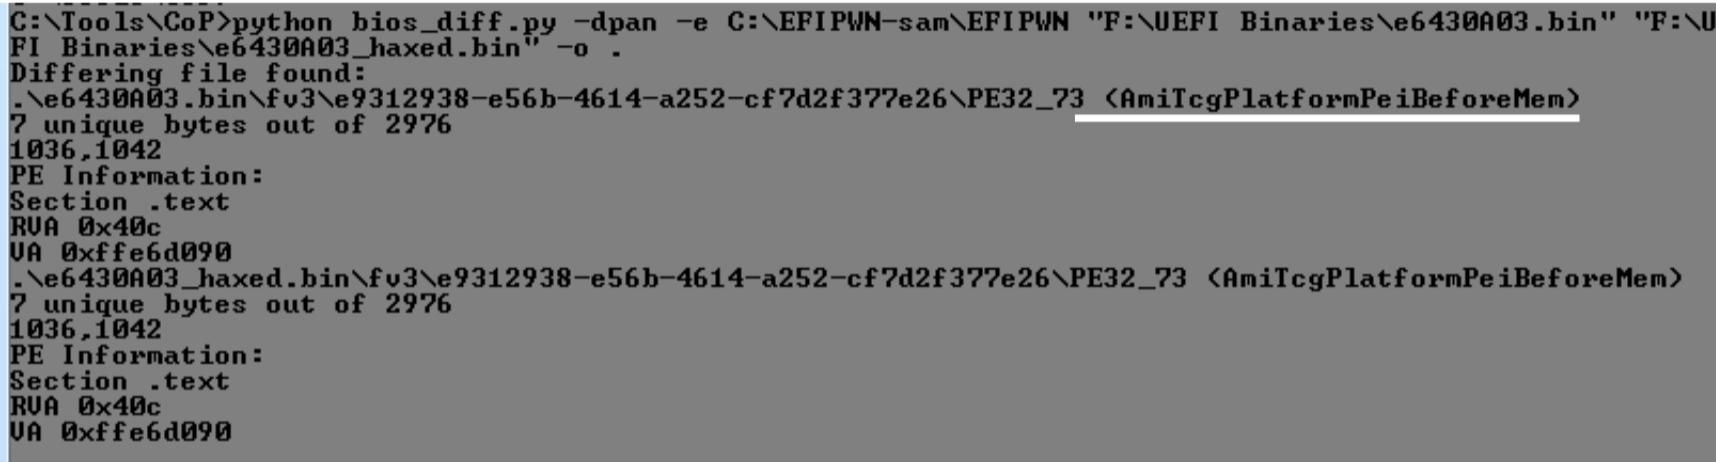
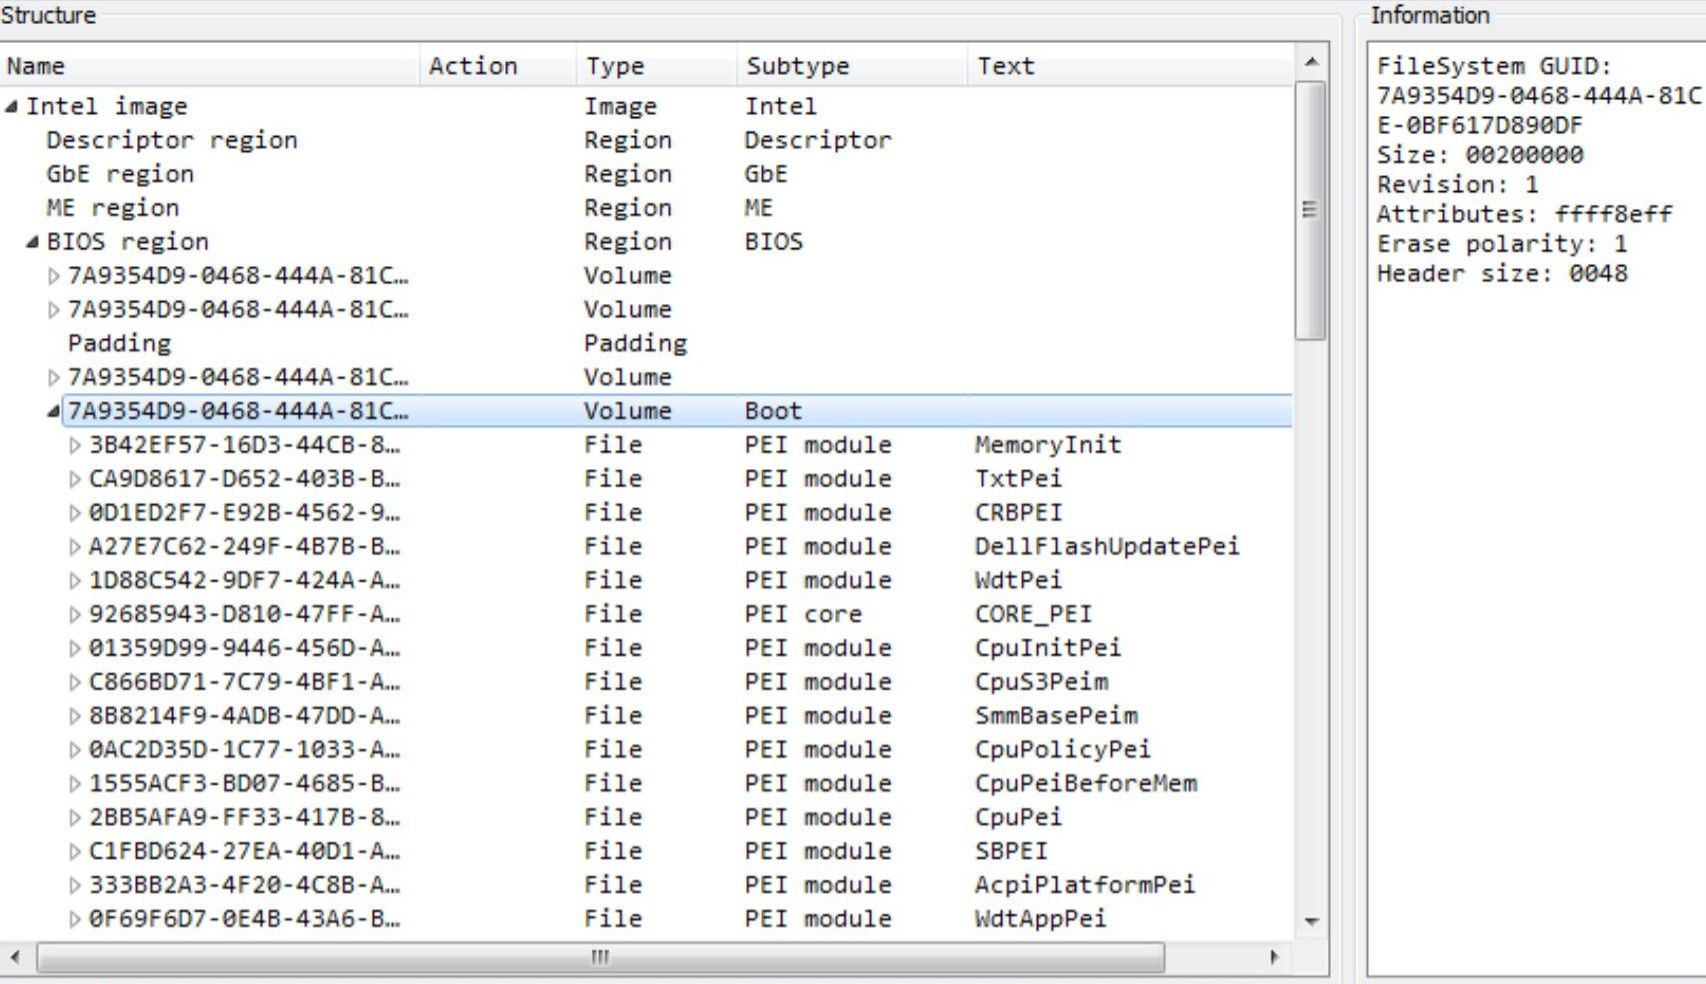
In above sample output e6430A03.bin is the old image and e6430A03_HAXED.bin is the possibly infected image. You can see that module AmiTcgPlatformPeiBeforeMem has been modified. Further you can use UEFITool to analyse that particular module.
Conclusion
We have learned to check the default protection of our BIOS/UEFI against some common rootkit malware that try to write to BIOS for persistence. Further to secure yourself you can update your BIOS to latest release provided by vendor and turn on secure boot(if not dual booted your system).
References:
Opensecuritytraining.info -Intro to BIOS
LoJax: First UEFI rootkit found in the wild, courtesy of the Sednit group